Guide to Scanning Film with a Digital Camera: My Process
A guide to scanning film with a digital camera to get better results than a flatbed scanner.
Fujifilm FinePix X100,
23.0mm,
1/40s,
f/2.0,
ISO 400
I've been trying a few different techniques for scanning film in the past few months and recently have reached a pretty good process (for me) that's producing solid results, far better in my experience than the flatbed scanner (Canon 9000F Mark II) I bought specifically for the purpose.
The improvement for me has been in two key areas: resolution and colour. The flatbed resolution realistically stops capturing detail way before its claimed resolution (2400ppi rather than 9600ppi according to many) and I've also found it doing quite a poor job of colour, leaving files with very little saturation and no range to pull the colours back out in post. Using my Fuji X-T1 to scan, the resolution possible is much higher and the colours are excellent.
The guide below runs through my setup and workflow in detail. It's a long one but I wanted to give plenty of detail on how to work through the whole process, hardware setup included. There are bits that will vary depending on your camera, means and setup but following the main points should get you to the same place in the end.
As with any project like this I started by attempting to make use of stuff I already owned, fashioning homemade pieces for some of the stuff I didn't and buying cheap versions of some items to test out the process. Some 'cheap' items worked out pretty well: the light pad and macro extension tubes both do their jobs as hoped so I don't feel the need to upgrade any further.
I won't pretend this has ended up being a particularly cheap project overall though. Assuming you start with a camera and tripod, you'll generally need to buy a macro extension tube and a light pad. On the software side, to do this well does mean forking out for a couple of programs that will make life way easier and the process more reliable.
I've still skewed towards the homemade and recycled where possible though. I'll note some improvements that could be made at the end.
Hardware
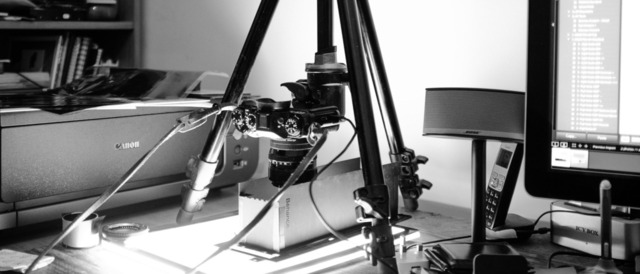
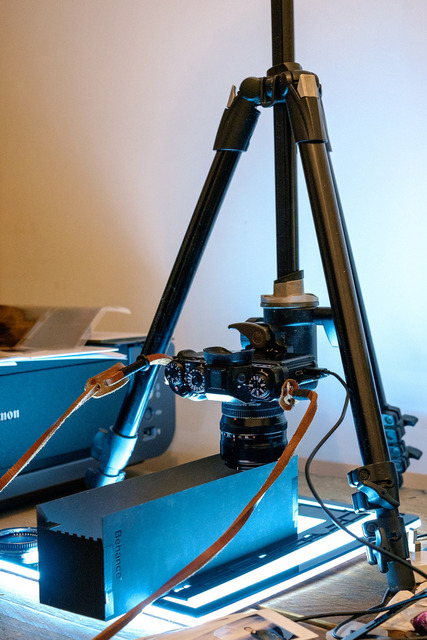
My scanning setup: Fujifilm X-T1 on a tripod, facing down at film on a light pad.
A digital camera. Obviously. I use my Fujifilm X-T1 but any digital camera with interchangeable lenses will do. Probably even a decent point-and-shoot with a macro mode would suffice if it has manual focus.
A macro lens, or prime with a macro extension tube. I use the Fuji 35mm 1.4 with these cheap extension tubes for the Fuji X-mount. Using just the 16mm tube with the 35mm lens gives a good balance of magnification and focusing distance while both tubes together provides more resolution through the extra magnification.
A sturdytripod that allows you to invert the main column to point downwards (see picture). I'm using an old Manfrotto 190 XDB tripod which seems to have been replaced with this fancier version now. I've been using a 3 Legged Thing Vyv tripod for lighter carry recently, but it's honestly not as sturdy as the heavier Manfrotto. We want sturdy.
A ball head for your tripod, to make it easier to adjust the angle of your camera and make sure you're absolutely perpendicular to the film.
A light pad (or other neutral, diffuse light source). I'm using a relatively cheap MiniSun LED light pad from Amazon. While the build quality isn't stunning, the light source is consistent which is the important bit here. Many SLR scanning tutorials use a remote flash hidden in a box with some white plastic, which seems a very complicated way of ending up with a light pad to me. Spend the thirty quid if you can.
A film holder. You could make your own; I'm currently using the holder from my Canon 9000F Mark II scanner, turned upside down.
Some sticky tape that won't leave residue on film. I used black electrical tape to start but then saw 3M/Scotch 'Magic tape' recommended which leaves less residue so I use that now.
Something to prevent light leaks over the sides of the film holder. As you can see in the photo, I cut up the cover of a Behance dot grid book as it was a nice matt black and quite strong card, then taped it into an open box to sit around the film as a kind of huge lens hood. This bit is actually really important or you might find light leaks across your scans.
USB cable to tether the camera to Lightroom, if that's an option for your camera.
Software
Adobe Lightroom. Not strictly necessary, but recommended as it streamlines the process quite a bit and it's a great tool for photography workflow and management anyway. You could also use Aperture, Capture One or whatever other tool you normally use to manage your photos, but this guide assumes Lightroom.
PTGui for stitching the scanned images together. Lightroom and Photoshop can both auto-stitch files but I've found the extra power and flexibility of PTGui to be worth the extra outlay, particularly in adjusting for the fact all the images are flat on the same plane as each other.
Adobe Photoshop. This feels very unnecessary as we're not using Photoshop itself, but the ColorPerfect plugin (see below) is sadly only available for Photoshop, not Lightroom so we have to use Ps to get to ColorPerfect.
ColorPerfect to invert our negatives and compensate for the film type we've used. Doing the inversion by hand in Lr/Ps is hell and messes up all the sliders (inverts them too) from that point onwards. Even after that, the colour will generally be wrong; ColorPerfect has profiles for just about any film you can think of and produces really nice results. Again, if you can afford it, buy it. It'll save you a lot of hassle.
The Setup: Putting it Together
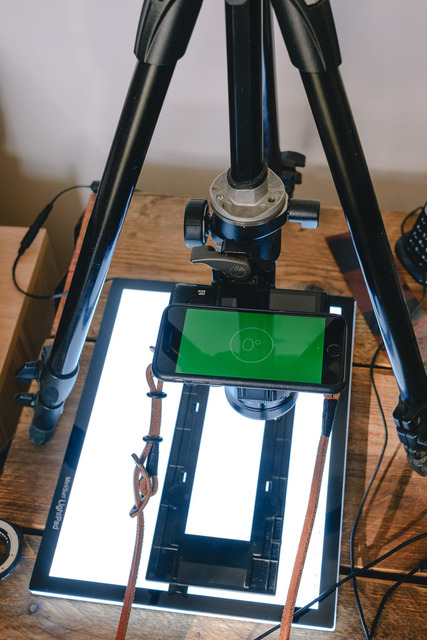
Tip: the Compass app on the iPhone is a pretty good substitute for a spirit level. My desk is far from flat, being made from three scaffolding planks. Make sure you measure both the camera and the light pad.
The basic setup is reasonably straightforward and can be seen in the photograph above and the cover image to this article:
Put the light pad on the table.
Invert the centre column of your tripod so that it faces down, then place the tripod over the light pad.
Adjust the ball head so that the camera will be pointing straight down (we'll fine-tune in a moment).
Attach your camera with macro lens (or extension tube and standard lens) to the tripod head.
Use a few small strips of tape to tape your film strip to the film holder, creating a moderate amount of tension across the film to keep it as flat as possible. Note: You'll probably want the film facing the right way up to the camera to save flipping in software once scanned but if there's any bend to the film, prioritise getting the film as flat as you can.
Lay the film holder on the light pad.
If you're tethering, plug the USB cable in between your camera and computer.
Level Up
We're almost there, but before we add whatever light shielding over the film that we've created, we need to make sure things are level.
One of the most important parts of this setup is making sure that the film is as flat as possible and that the camera lens is exactly perpendicular (at a 90 degree angle) to the film.
A spirit level will help you get there but if you don't have one the Compass app on the iPhone (I assume there's an equivalent on Android) will also help you balance things out. Lay the phone flat on the light pad and make sure it's level, then do the same with the camera. On the X-T1, I balanced the camera on the (extended) eye cup, which should be parallel with the camera back.
Once you're happy, get the light cover over the film and we're good to go…
Camera Settings: Manual
Now is the time for full manual settings – working round from ISO to aperture, then finally shutter speed.
ISO
You want to be in your camera's native ISO setting (the Fuji's native ISO is 200, where a Canon or Nikon is generally 100). Many modern cameras are 'ISOless' (see Rico Pfirstinger's explanation for Fuji) but it's worth setting the lowest non-expanded ISO for the best results. Avoid the expanded ISO even if it seems like that would be better quality (i.e. the ones labelled things like L, H1, H2), as they're applied in software and you're throwing away a little accuracy.
Aperture
Next up, aperture. I go with f/8 as a good sweet spot for sharpness on pretty much any lens.
Shutter Speed
Finally, shutter speed. Here's where your camera's histogram comes into play. Remembering that we're working with negatives and assuming you've only got film within the frame of your camera, you want to 'expose to the right': to pull the whites as close to the right of the histogram as you can without losing data. If you've only got film in view (not your holder), the blank edge of the film is going to become pure black, so getting that close to pure white in your exposure (for negatives) is a good starting point.
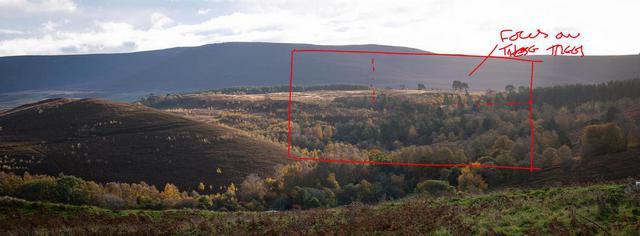
Focus
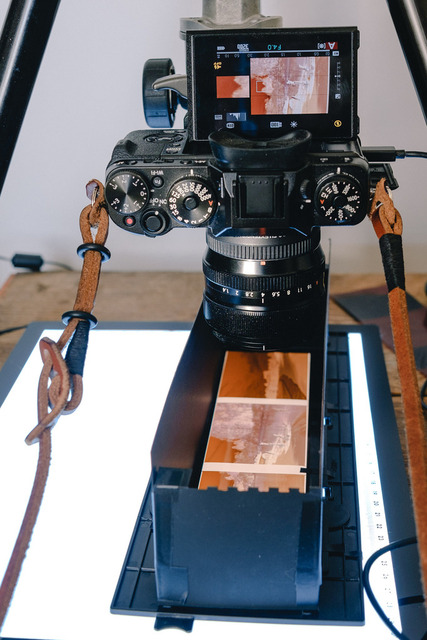
The X-T1's articulated back screen and focus peaking really help get your focusing right.
This is a difficult one. Getting your focus right is crucial for a good scan but can be a chicken-and-egg proposition: it's dangerous to set focus on the negative contents as you don't know if you actually nailed focus in the image, while you won't know if you nailed focus in the image until you've scanned or printed it.
Given the macro setup, your depth of field is also going to be very shallow but at f/8 shouldn't be too unforgiving. One of the fantastic things about the Fuji mirrorless cameras is the various focus aids you get in the electronic viewfinder (EVF). Depending on the frame, I use focus peaking at 100% magnification on either a section of the image I know to be in focus (if I do) or on the edge of the frame (i.e. focusing on the film edge itself) and making sure the depth of field wraps either side so the negative will be in focus (again, the Fujis have nice depth of field scales in the EVF). If you can see some of the writing down the edge of your film (usually the make and type of film), that can be a decent starting point for focus.
This may (read: will) involve some trial and error to get right, so don't worry if it takes a few atempts.
The Scan
Now that we're ready to scan our first frame of film, it's time to actually capture some images and key here is keeping things steady.
Don't Move
If you've got a camera you can tether with Lightroom, this bit should be relatively easy as the computer will be triggering the shutter and there won't be any extra vibration in the camera to blur things. If you can't tether your camera, a remote release will do the same job or, failing that, use the timer on your camera (e.g. 2 second delay) so that by the time the shutter is released there's no residual movement from you handling the camera. I'm going to assume tethering as that's what I use and it transfers the images straight over to Lightroom.
Tethered Capture
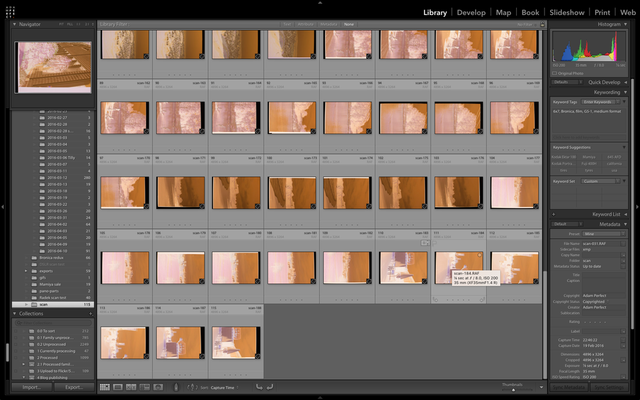
In Lightroom, go to File > Tethered Capture > Start Tethered Capture…
You'll see a window pop up offering some settings, including where to save the files. I have a generic 'scan' folder I save to and then move the keepers out to my normal photo file structure later on. Once you're happy with the settings, click OK and you'll see the tether control overlay appear, with Lightroom jumped to your 'scan' folder in Library view.
Now it's time to line your frame up in the viewfinder. Assuming you've got a level of magnification that means you can't fit the whole frame in one shot, start at one corner, with some of the film frame showing on two sides and hit the shutter button on the tether panel.
Importing the scans into your Lightroom library means you can easily come back to them later and re-run the stitching process if needed.
Once the camera has taken the shot, slide your film frame along ready for the next shot. A good rule of thumb here is the same as taking panoramas - you want a decent amount of overlap to help the photo stitcher in the next step, so I usually look for a point of interest toward the edge of the image that will be moving through the centre, then slide until that reaches about 2/3 of the way to the other side and take the next shot.
Repeat this until you hit the end of the frame, then shift in the other axis (i.e left/right where you've been going up/down) and go back the other way until you've got shots to cover the whole picture. Wait a couple of seconds for the data to shift over to your computer and you're done taking the actual scan and now it's all software work to turn it into a usable photograph again.
Stitching it Together
As mentioned earlier I've been using my Fujifilm X-T1, a 16mm macro extension tube and the Fuji 35mm f/1.4 lens. For the 6x7 medium format film I shoot with my Bronica, that tends to leave me with 6-8 overlapping frames on the Fuji to stitch together.
For photo stitching, Photoshop obviously has a built-in tool and so now does Lightroom. The photo merge in Lightroom is next to useless for this kind of stitch as it assumes some kind of perspective distortion needs to be compensated for (panoramas tend to rotate on an axis in terms of their field of view) and so you'll get a warped result. Photoshop has a 're-position' mode that should work for our single-plane stitch but I've found it still leads to quite a bit of distortion and it's also really slow.
As a result I forked out the money for a tool called PTGui, a dedicated panorama stitching tool. There are others like Autopano Giga which is almost twice the price, so for now I've gone with the slightly more clunky interface of PTGui and it does the job very well.
PTGui
While we've imported our images straight into Lightroom through the tethering plugin, we're now going to skip Lightroom for a moment and jump over to PTGui. We could select the images in Lr, click 'Edit in' and choose PTGui but, because of the way PTGui handles settings (i.e. it forgets them between 'projects' - see further on), after the first time of using PTGui I've found it quicker to open a ready-made 'project' and select the source files from there.
The PTGui interface is not the most intuitive. Luckily we don't need to touch a lot of it and I'll walk you through the steps here. Our first job is to switch PTGui into advanced mode, clicking the small button in the top right of the 'Project Assistant' tab.
Load Images
This should be simple enough - just select the files you've just 'scanned' with the camera from the folder you saved them into and open them in PTGui, either via the 'Load images' button on the main tab or through the 'Source Images' tab.
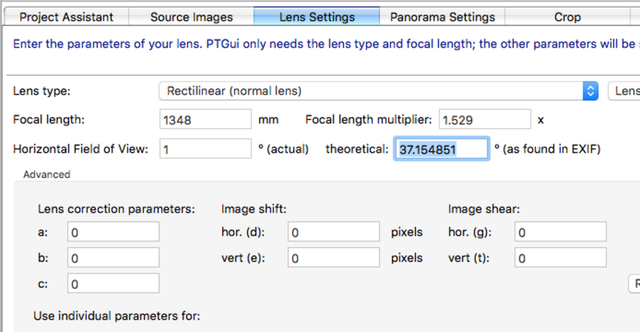
Set the horizontal field of view to 1°Lens Settings
Now click over to the 'Lens Settings' tab and set the horizontal field of view to 1°. This setting tells PTGui that all our images are on a flat plane together - there's no perspective distortion to correct for as you'd get in a normal panorama. This process is recommended in PTGui's own docs for stitching scanned images.
Generate control points
Generate Control Points and Optimise
Now we can ask PTGui to have a go at automatically figuring out where each image overlaps and fits with the other images. Go to the Control Points menu and click 'Generate Control Points'. PTGui will do some thinking and hopefully not return any errors. If you have a look in the Control Points tab once it's done, you should see that each image has a bunch of numbered markers that match key points common to two of the images.
With that done, it's over to the 'Optimizer' tab where we want to un-tick the 'Optimize lens field of view' checkbox (again, there's no field of view to optimise for here) and then set 'Minimize lens distortion' to 'Heavy + lens shift'.
Aim for a small maximum control point distance to get seamless stitches
Hit 'Run optimizer' and PTGui will now get started on its real work: lining up the images with each other and making sure that they're stitched together as seamlessly as possible. Once done, you'll get a small report modal showing the variation in control point distances in pixels. Hopefully the maximum is only a few pixels and you'll get a 'very good' rating. If the number's too big, you might want to go back to the control points tab and manually set some control points to help it out.
At this point, your image is fully stitched together and there's just a (slightly annoying) final task to make sure it exports nicely…
Alignment and Saving
For some reason best-known to the developers (or I'm doing something wrong), PTGui doesn't auto-centre the final image within its canvas or size it to fit. This means if you go and create your panorama now, you may find you get an image with a load of white space you didn't want as well as some of your image cropped out.
To prevent this, open the Panorama Editor (overlapping boxes icon in the toolbar) and then click the 'Center Panorama' button, followed by the 'Fit Panorama' button to the left of it. This will, unsurprisingly, centre and then fit your pano to the canvas to make best use of the space.
With my 16MP Fuji X-T1 I've managed 100 megapixel scans from 6x6 film using this method.
Set optimum size and generate a 16-bit TIFF
With a usable image, it's finally time to save out our result. Head to the 'Create Panorama' tab and first click the 'Set optimum size' button, which will set the export to a 1:1 pixel map of the stitched image so you're not losing any data. As you can see from the screenshot here, I've ended up with a roughly 6k x 7.5k image, or just under 45MP. The nice part of this method is that—with the right camera/lens/macro tube combo—you can go as high-res as you like. With my 16MP Fuji X-T1 I've managed 100 megapixel scans from 6x6 film using this method.
Next, set file format to TIFF and change the settings to 16-bit quality. Choose a location (I'd recommend the same folder the individual source images were in) and file name, then click 'Create Panorama' and we're done with PTGui for this image! You just need to import the finished TIFF file into Lightroom so that it's in your library for the next steps; if you saved it in the same folder as the source files, just right-click on that folder in the Lr Library view and click 'Synchronize Folder…' to pull it in automatically.
Processing
With our stitched-together photograph, we're ready to start processing the image. Assuming you used negative film the next step is to get the colour inverted correctly.
There are plenty of tutorials around online showing how you can flip the curves in Lightroom or Photoshop to invert the colours and then work your way from there. This will work and is certainly cheaper than buying any extra software but involves a lot of manual steps, doing your own colour correction and that many of the sliders in Lightroom (e.g. whites/blacks/highlights/shadows) will be reversed which is just confusing.
As a result, I use a great Photoshop plugin called ColorPerfect. It's annoying that this isn't available as a Lightroom plugin as it's the only thing forcing us to launch Photoshop during this process, but I think it's worth the small extra hassle.
Converting the Negative
Use Lightrooms guided upright transform tool to make sure the negative is properly straight
The TIFF file we've imported to Lightroom needs a quick tidy-up before moving to colour correction in ColorPerfect: we need to crop out any of the film holder or white space introduced during the scan and stitch so that those colour values don't skew the conversion results.
Select the stitched photo then go into Develop mode in Lightroom.
The first thing we need to do is get things straightened up. It's quite likely that, even with the settings we used in PTGui, our image isn't going to be perfectly squared off so we need to help things along a little.
The upright transform tools in Lightroom are great for this and the guided transform in the latest Lightroom update makes it even more accurate. Choose guided upright, then draw the guide lines along the four edges of the negative frame.
Crop away anything that's not film, leaving some of the 'black' area to the side of the frame
Our image is now straight and it's time to crop away anything that's not film, while being sure to leave some of the blank film area so that ColorPerfect has an example of pure black in the image.
Once cropped, right-click on the image and choose Photoshop from the 'Edit In' sub-menu. When the prompt pops up, choose to edit a copy with Lightroom adjustments. After a few seconds (or many, depending on your computer), Ps will open with your image.
Head straight up to the Filters menu and click CFSystems > ColorPerfect. This will launch the ColorPerfect window where you should find it's already had an initial go at converting your negative into corrected natural colour.
The ColorPerfect UI is also not very intuitive but luckily we only need a couple of features here
There are now two main things to do within ColorPerfect: match the film type and make sure we're not blowing out the highlights.
In the bottom left of the window, you'll see a couple of drop-down menus. In the screenshot above I'm within the 'My Films' folder (like a favourites list) but first time through you start by choosing the brand of film you used and then selecting the specific film type in the second drop-down. ColorPerfect has excellent profiles for just about any film you might be using to give a solid starting point for the conversion.
With the right film selected, we now want to make sure we're not clipping the highlights if possible. Ben Anderson has a great run-down of using ColorPerfect, so I won't try to repeat too much here. In short: the highlights fields in the top of the window show how much clipping is happening to the highlights and allow us to recover them. In my example screenshot above, only 0.14% of pixels are clipped (in this case, most likely just dust particles that have shown up pure white) so we could arguably leave it there. If you had more being clipped, the drop-down two to the left sets a compression range in stops and increasing this can pull the highlights back for us. I really recommend reading Ben's tutorial for a proper explanation.
Recovering clipping here gives us more leeway to post-process in Lightroom afterwards, but if you're not planning on that you can just get things to your taste in ColorPerfect and be done.
Once we're happy with our colour conversion, hit 'OK', save the Photoshop document and switch back to Lightroom where our newly correctly-coloured image should appear in a few seconds.
And Done
After the ColorPerfect step, you have a fully scanned image and depending on preference could stop there and enjoy the natural colours and reproduction of your film. Alternatively, you've now got a very usable TIFF file in Lightroom with which you can follow all your usual post-processing steps.
It's taken me quite a long time to explain this process and it will probably be a bit slow for you to follow the first couple of times, but once you're up and running it's not that much slower than using a flatbed scanner and can give you seriously better results.
Next Steps
There are a couple of next steps I'm taking with my film scanning: ANR glass to keep the film flat and a new camera.
ANR Glass
While writing this article, I've been using the film holder from my Canon 9000F Mk II flatbed scanner and taping the film to the underside of the holder, then flipping it over to get the film as flat as possible. I'd been looking to get some anti-Newton ring (ANR) glass for a while to allow taping the film fully-flat to glass without the horrible Newton rings one gets with normal glass.
I do now have some ANR glass (a very good holder and glass set from Better Scanning) and as time allows around being a new father, I'm going to run new tests with and without the ANR glass on both the Canon scanner and with the Fuji.
The couple of very early, very quick tests I've done actually showed a massive improvement in the scan from the flatbed Canon, so I'll try to follow up on this article once I've tested whether using the digital camera still provides enough extra detail to be worth it (I think it will).
I'd be more happy using the flatbed for a quick scan now and I'm hoping I'll be able to get similarly improved results from the Fuji using the ANR glass.
New Camera
This one's nothing to do with the scanning per se, I'm just upgrading my main camera and swapping the Fuji X-T1 for the new X-T2. My pre-order is in and I'm excited to play with the new Fuji powerhouse next month. In scanning terms, it's going to give me a big boost in resolution: 50% higher from 16mp to 24mp. That should let me get the same high-res scans from fewer frames using less macro extension, or even higher resolution scans using the same setup.
Thank You for Reading
If you've made it through this epic, I applaud you and sincerely hope it's been of use. Do let me know on Twitter or by email.