Photography
Image markup in Lightroom
Annotating your photographs for processing notes and later reference
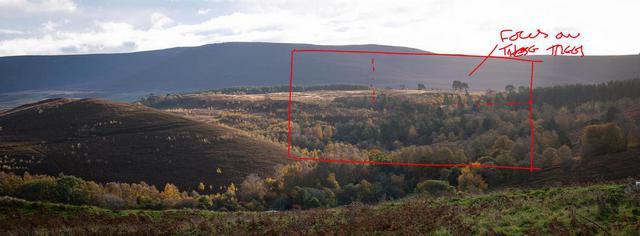
There are books published collecting the marked-up contact sheets of famous photographers, physical annotations that have been an important part of the process for decades. But what do we do with digital files, in Lightroom?
First: besides looking cool, what’s the point of a marked up contact sheet?
One use was to select and reject frames for further processing and/or printing. Lightroom has this one solved way more efficiently with flagging and rejecting.
Next up is the more interesting (to me) use, and one which Lightroom itself doesn’t cater for: annotating images, whether to pass on notes for processing and printing or simple reminders about why a frame was selected/rejected.
Bizarrely, 15 years into its life Lightroom still doesn’t even provide a way to write simple notes to attach to an image, let alone write on top of one. Yes, we can add a title and caption to the Exif data, but that’s intended as more final-image content than work-in-progress notes for the photographer.
What to do?
This lack of support for writing or drawing on top of an image to make notes (or, indeed, anywhere to even write notes about an image) in Lightroom has often felt odd to me. It’s obviously a process more historically focused on editorial processes, but plenty of those still exist and I can’t believe photographers have lost complete interest in noting thoughts about their images.
So what to do if you do want to annotate your images?
There’s unfortunately no reliable Lightroom-specific answer to this, but here are some options:
Just write notes?
Many (most?) cases could probably be covered with simple text content attached somewhere along with the photograph. Lightroom doesn’t even make this easy, but John Beardsworth has created the Big Note plugin to allow you to write notes in a custom metadata field.
Roughly once a year I decide to look into writing my own plugin that could do a bit more and then remember how awful Lua (Lightroom’s scripting language) looks to write and rapidly give up again. Maybe Lightroom CC will eventually provide a better, more modern API…
Adjustment brush
One suggestion I’ve seen in a few places over the years—that lets you actually mark up the image itself—is to use Lightroom adjustment brushes.
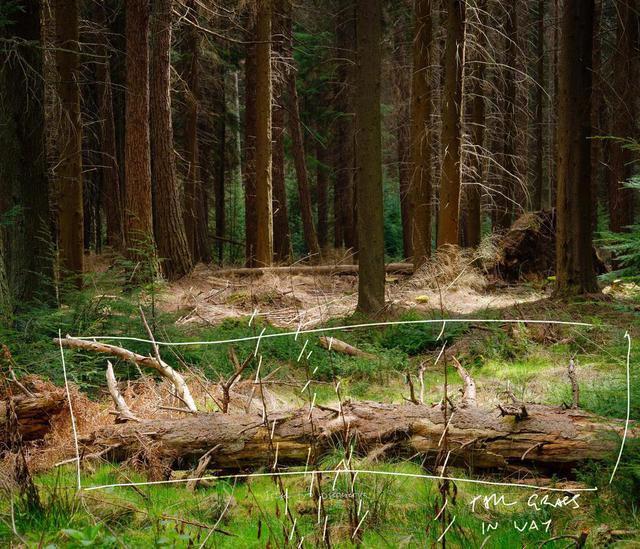
This does work—it keeps everything inside Lightroom; you can just create a virtual copy to do the annotations on and stack the images—but definitely also has downsides.
Because we’re just using adjustment brushes, you have to find an adjustment that will show up clearly wherever you’re writing on the image. I set up two quick presets: a light-on-dark and a dark-on-light that respectively push exposure up or down 4 stops.
This is fiddly though, and will still struggle to be legible on some images, or portions of images, depending on their light levels and contrast. Another issue I’ve found is a common irritation with drawing brush adjustments in Lightroom: starting a new stroke too close to an existing one instead ‘grabs’ the adjustment and moves it, rather than actually drawing a new brushstroke.
Again, there’s a way around this (setting ‘Show Edit Pins’ to ‘Never’), but that’s annoying as you have to keep turning it on and off as needed.
Finally, and as you can see in the example image above, brush adjustments don’t draw smoothly enough to produce easily legible handwriting. While my handwriting is bad, it’s not quite as bad as you see above and that’s because even when writing with a stylus, Lightroom isn’t tracking position rapidly enough to create the complex shapes in handwriting, leaving sharp angles and missed details.
Which makes sense, as it’s not an intended use for these brushes.
My current solution
And so, finally, to the best compromise (and it is a compromise) I’ve found so far for my needs: Photoshop.
Lightroom has a pretty solid round-trip behaviour for sending an image to Photoshop and back again, so I follow this method:
- Right-click > Edit In... > Edit in Adobe Photoshop
- Add annotations in Photoshop with a much better brush tool
- Save and return to Lightroom
After this, a new TIFF version of the image will appear in Lightroom with the annotations. I usually add the extra step of adding an ‘annotated’ keyword in Lightroom so I can find them all in a smart collection later.

You’ll see above that my handwriting still isn’t great but is rendered much more smoothly and most of the illegibility at this point is my own doing.
Using Photoshop also gives full control over brush colour (so you can use a strong colour unlikely to clash) and you can of course use the full power of Photoshop for drawing shapes, typography and more should you wish.
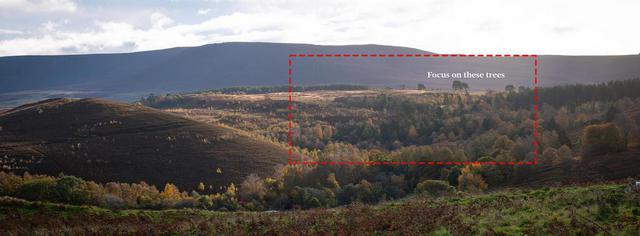
Photoshop, by its nature, gives way more control and depending on your computer, it doesn’t take too long to make the round-trip.
There is a cost though, which is the creation of an extra file on disk—a chunky TIFF file no less. The above image went from a 46MB RAF file to a 380MB TIFF! That’s a lot of extra data just to doodle some words and lines.
For now, for me though, it’s a price worth paying: I don’t annotate all that many images and disk space isn’t an issue.
See what works for you
Everyone’s needs and workflows are different so see which, if any, of the above work for you. Perhaps it’ll be a combination.
If you do find one works for you (or if you find another way!), let me know!
Please help, Adobe
None of which is to say that any of these solutions makes annotating images easy. Capture One added annotations a couple of years ago, and while its target market is more towards the professional end and people more likely to want/need the feature, I’d love to see Adobe add an equivalent in Lightroom.
