Photography
Old growth at Plessey Woods
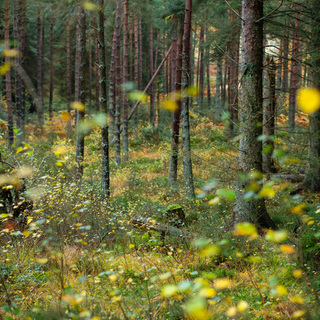
A recent discovery on my morning outings with the kids has been Plessey Woods: a country park with some beautiful old growth woodland and loads of easy trails to follow.
Last weekend we went as a whole family for an early morning walk and headed down a trail that criss-crosses a stream running through the old woodland, eventually feeding the River Blyth.
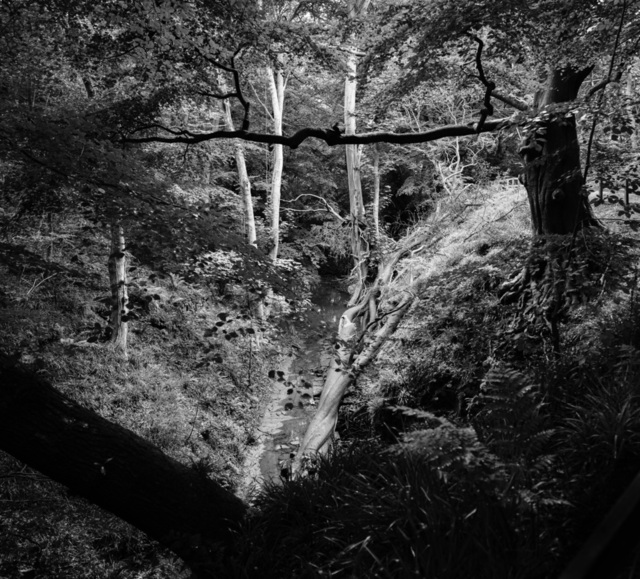
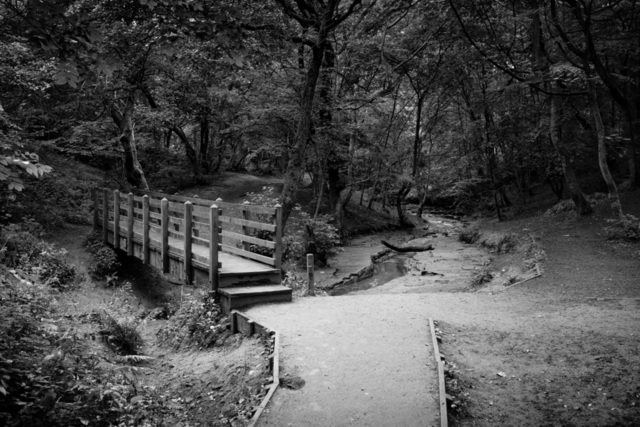
After descending a long run of steps set into the hillside you open onto a small clearing with a lovely wood bridge, crossing over a stream which has carved through the solid rock at the forest floor.
The photograph above is the view you have as you reach the last step on your way down, and it’s a lovely little scene, with the path folding off to the left, over the bridge and then up along the hillside. Meanwhile, the stream enters from your left, under the bridge and then winding away in front of you through the rock, which creates some lovely sharp angles and smooth surfaces amongst the clutter of the forest.
For this visit, I took the small-but-mighty Fujifilm X100F with its fixed 23mm F2 lens, and the standard 35mm-equivalent full frame field of view worked really nicely. The whole scene fits perfectly within the frame, almost designed for photographers.
Post-processing
While this scene does work in colour, I just love it in black and white. I’ve had my X100F set in the ACROS base profile in-camera for a while, something I particularly enjoy with the rangefinder-style bodies, which lets me focus on the light levels and contrast in an image rather than be distracted by colour. It’s an in-camera version of the post-processing trick of editing an image in black & white to get the composition balanced light-wise, before flipping back to colour to finish off.
Also, ACROS is just a beautiful way to see the world.
Pulling the images into Lightroom, I knew straight away I was almost certainly going to keep this one in monochrome. I have a couple of nice contrasty presets I’ve created based on ACROS profiles but also quickly decided I wanted a more tailored, measured approach to this image.
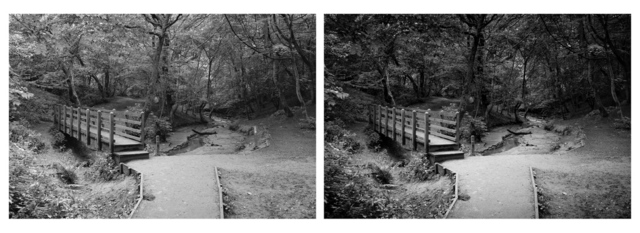
The raw file is much flatter and brighter than the finished image, though that brightness was a mix of aiming for good dynamic range to work with and laziness in leaving metering to the camera: neither things I intended to keep in post as it was not a bright scene in real life. The relatively low contrast did appeal but also left the leaves around the edges drawing attention away from the main subjects: the bridge and the stream.
I’ve been focusing a bit more on dodging and burning selective areas of my images recently, aiming to draw the viewer’s eye to the desired areas of an image, and I did a bit of detail work on this one too—albeit all in Lightroom.
Mostly I focused on pulling down the exposure of the leaves throughout the scene, creating a darker overall image and making the path, bridge and stream much brighter within the image without actually brightening them (it’s a woodland scene under heavy tree cover: nothing should really be clipping highlights).
I did do a tiny bit of brush-dodging to bring back up the highlights in the path on the other side of the bridge, then added a radial filter over the stream to increase the white level and pull attention through the frame into that area.
Vignetting

Taking a tip from Thomas Heaton, rather than use Lightrooms built-in vignette tool to darken the corners I zoomed right out to a 1:8 view and created a huge radial filter—much bigger than the whole frame of the image—then sized and placed it accordingly to create a vignetting effect in the areas and amounts I felt the image needed.
The top third of the image was still on the bright side, so I layered a second radial filter, more centred horizontally but sitting lower vertically, to affect only the top of the image and pull the exposure down there a little more.
Goodbye, route marker
The more controversial (I think) edit I made to this image, and one I don’t often make, was to remove an object from the scene: a waymark/route marker post on the right of the frame.
The wooden post added just enough visual clutter on the right side of the image to be distracting and disrupt flow through the scene, so I decided to have a quick test of the spot-removal tool in Lightroom. If it had done a bad job (as Lightroom so often does), I probably would have given up and left the post in—it wasn’t distracting enough for me to shift the image to Photoshop—but Lightroom did a surprisingly good job and once done, it totally opened up that side of the image, odd as that may seem for just a small part of the original image.
Finished image
And so, finally: a finished image.
A combination of relatively simple edits add up to quite a change in the tone and feel of the photograph. Radial filters aside, at the global level I only applied basic adjustments: exposure, highlights, shadows and blacks, plus some added contrast and reduced clarity (lazy man’s Orton Effect).
A scene scouted
Ask me again in a few weeks or months, but I’m currently happy that I captured this scene pretty well. I’ll undoubtedly photograph it again on future visits but it’s not one I actively feel the need to re-shoot and improve on for now. Different conditions or changing seasons with the same framing, perhaps.
A little further round the trail though, the path climbs steeply up the side of a little gully where there's a scene I definitely want to go back to. From the path, you look down into the gully and see a huge, downed tree trunk lying by the edge of the stream, with a number of other tall old trees standing sentry around it.
I spotted this on my first visit and this time round, managed a quick hand-held pano to get a reference shot. I’ve processed that pano in similar style to the bridge seen above and do quite like it, though I think I could do better being back without the kids and having time to properly frame and set up a composition. Here’s the image: